
If you want Eclipse to configure the environment, you must first download and install Eclipse.
After installation, follow the Eclipse environment configuration step by step. Here are some important steps of Eclipse and environment configuration.
Step 1 is to modify the default workspace code set of Eclipse.
The default encoding set is GBK and modified to UTF-8. Find Window → Preferences and enter Workspace in the input box in the upper left corner. Find the second Workspace and change the encoding set to UTF-8. Finally, click the Apply and Close button.
Step 2 is to modify the resource file code set of Eclipse. Change to UTF-8.
Find Window, and then find Preferences. Enter Content Types in the input box in the upper left corner. Find General, then find Content Types, and click to open text in Content Types. Go to Java Properties File, Java Source File, and XML under Text. Enter UTF-8 in the default encoding input box below. Then click the Apply and Close button.
Step 3 is to set CTEL + s to automatically format all lines when saving.
Find Preferences in Window. Enter Save Actions in the input box in the upper left corner. Find Java, click enter, find Editor, and then click to find Save Actions. Check the first three. Finally, click the Apply and Close button.
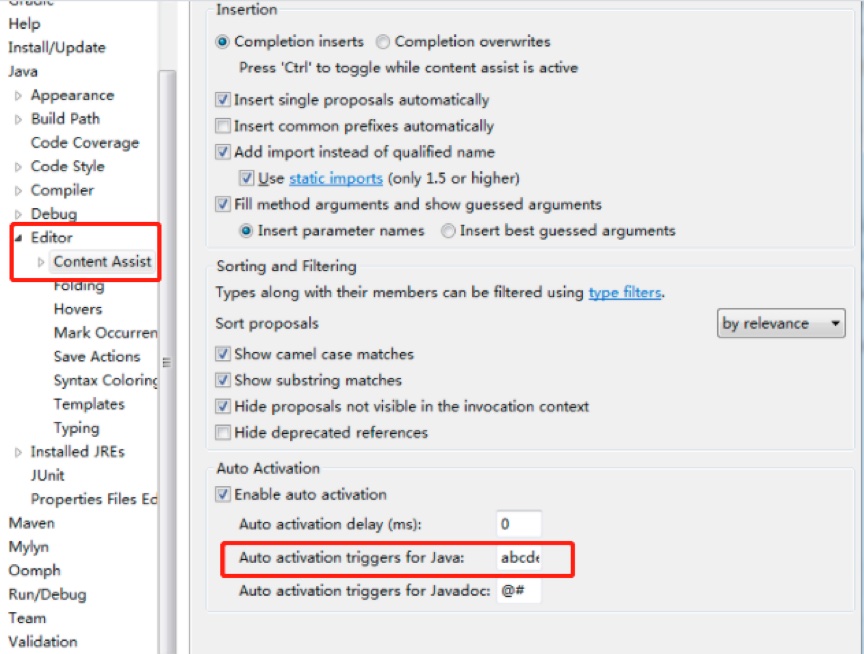
Step 4 is to set the content automatic prompt.
By default, Eclipse will automatically prompt the content when you press the button (period). Now set the case of any letter to automatically prompt the content. Find Preferences in Window. Enter Content Assist in the input box in the upper left corner. Find Java, click in, find Editor, and then click to find Content Assist. Enter "abcdefghijklmnopqrstuvwxyz" in the corresponding input box of Auto activation triggers for Java. You can enter any letter you want to trigger auto completion. There is no need to separate the middle, input in turn. Finally, click the Apply and Close button.
Step 5 is Eclipse shortcut key configuration.
Find Window → Preferences. Enter Keys in the input box in the upper left corner. Find General to Keys. In the Keys window, type Debug Java Application in the input box. Find it and change its Binding to Alt + E. Enter Debug JUnit Test in the input box of the Keys window. Find it and change its Binding to Alt + R. In the Keys window, type Debug on Server in the input box. Find it and change its Binding to Alt + Q.
Step 6 is Eclipse background color configuration.
Find Preferences in Window. Enter Text Editors in the input box in the upper left corner. Find the Editors in General, and then go to Text Editors. In the Text Editors window, select Background color from Appearance color options. Remove the check from System Default on the right. Click the Color selection box next to color.
Step 7 is to modify the default browser of Eclipse.
Find Window → Preferences. Enter Web Browser in the input box in the upper left corner. Find General → Web Browser. Use internal web browser is selected by default. We modify and select Use external web browser. Check your favorite browser in External web browsers. I checked Chrome here. Finally, click the Apply and Close button.

The above Eclipse environment configuration steps should not be ignored. You need to pay more attention when configuring the environment. Otherwise, one wrong step will affect the use.
